Training Videos
Creating a New ReadyNeighbor Report (future)
Creating a New CERT Report (future)
Creating a new Hazzard report (future)
Data output structure (future)
Excel format data viewer (future)
NeighborCheck App User Guide
What this App is for:
The NeighborCheck app is used by READY NEIGHBOR groups, CERT search and rescue teams, and utility workers to gather critical information for utilization by Emergency Operations Centers immediately after a major disaster.
How the App is organized:
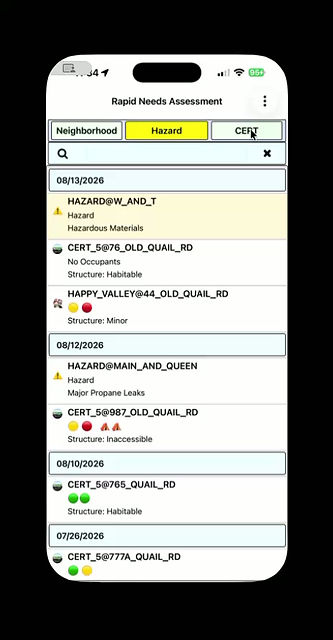
The App is divided into 3 sections that are specifically tailored to READY NEIGHBOR activities, CERT activities, and hazards that public sector workers and other may come across and wish to report.
The sections of the app for READY NEIGHBOR and CERT activity are modeled after the FEMA rapid needs assessment Form and are tailored to match their activity sequence. The section used by public sector workers allows them to locate, describe, and photograph locations that may be hazards to the public and impede rescue efforts. Public sector workers may include, PUD workers, City and county road crews, Police and Fire personnel.
For READY NEIGHBOR and CERT users of this App, the data collection sequence mirrors the natural sequence of search and rescue activity as teams go house to house.
How to use the NeighborCheck App- Step by step:
Tips for saving time: The SET USER DEFAULTS button
To help make the data entry faster you can pre-load certain common data field answers like City , State and ZIP code.
Press the “set User Defaults” button and fill out only the fields that pertain to your activity.
READY NEIGHBOR people only fill out READY NEIGHBOR Group Name fields
CERT people only fill out the Cert group number and Cert Squad Name fields
ALL users fill out the CITY, ZIP, and STATE fields
Starting a Ready Neighbor report
Select the New ready neighbor report button.
There are 6 sections you will go through. INFO, LOCATION, HAZARD, PEOPLE, ANIMAL, and NOTE
The info section:
First an automatic date and timestamp as you start the report.
You can manually edit these if needed.
Next identify your READY NEIGHBOR search group. This is already filled in if you used the SET USER DEFAULTS button and preloaded the information.
The Location Section:
This section collects information related to your visit to this site, including ability to get there, street address and capturing the GPS coordinates.
We will automatically capture GPS location. For most accurate results please stand at the center of the property away from the street and near the front door. If the GPS location accuracy is low the data will appear red in color. Try again. You may need to move. Yellow indicates a bit more accuracy. If the data shows green you are good to accept the data.
The Hazard Section:
This section collects information about conditions around the outside of the Structure and will help you determine if you go inside. Information related to power, water, fire, gas , structural conditions etc.
The People Section:
This section lets you note the number of people you find and their medical condition and what kind of help they may require.
The Animal Section:
This section helps you list pets and farm animals and identify what help may be required for their care.
When identifying animals and their condition, you can select multiple answers.
The Note Section:
This is the final step in the information collection process.
You have the opportunity to take a photo to document unusual situations and all enter any additional notes that you feel are needed to describe the situation. There will be an automatic date and time stamp as you finish the report.
You will have an opportunity to review and edit this report before saving this file.
Starting a CERT report
Select the New CERT report button.
There are 5 sections you will go through. INFO, LOCATION, HAZARD, PEOPLE, and NOTE
The info section:
First an automatic date and timestamp as you start the report.
You can manually edit these if needed.
Next identify your CERT group. This is already filled in if you used the SET USER DEFAULTS button and preloaded the information. Next identify your Squad name. Then note accessibility to site.
The Location Section:
This section collects information related to your visit to this site, including street address and capturing the GPS coordinates.
We will automatically capture GPS location. For most accurate results please stand at the center of the property away from the street and near the front door. If the GPS location accuracy is low the data will appear red in color. Try again. You may need to move. Yellow indicates a bit more accuracy. If the data shows green you are good to accept the data.
The Hazard Section:
This section collects information about conditions around the outside of the Structure and will help you determine if you go inside. Information related to power, water, fire, gas , structural conditions etc.
The People Section:
This section lets you note the number of people you find and their medical condition and what kind of help they may require.
The Note Section:
This is the final step in the information collection process.
You have the opportunity to take a photo to document unusual situations and enter any additional notes that you feel are needed to describe the situation. There will be an automatic date and time stamp as you finish the report.
You will have an opportunity to review and edit this report before saving this file.
Starting a HAZARD report
Select the New HAZARD report button.
There are 3 sections you will go through. REPORT, DETAILS, and REVIEW
The Report section:
First an automatic date and timestamp as you start the report.
You can manually edit these if needed.
We will automatically capture GPS location. For most accurate results please stand a safe distance from the hazard you are documenting. If the GPS location accuracy is low the data will appear red in color. Try again. You may need to move. Yellow indicates a bit more accuracy. If the data shows green you are good to accept the data.
The Details Section:
This section lets you select the hazard you want to report. And gives you the opportunity to photograph the hazard and add any description you feel is required.
The Review Section:
You will have an opportunity to review and edit this report before saving this file.